![ID-logo-colour_version_2.png]](https://answers.id.com.au/hs-fs/file-2628100188-png/images/ID-logo-colour_version_2.png?height=40&name=ID-logo-colour_version_2.png)
This article is for Placemaker customers.
Put your own locations on the map, next to .id data
Upload a file of your organisation's sites, assets or boundaries and Placemaker turns it into a layer you can show on the map. Use this when you want to see your own network – branches, facilities, service areas – against population and growth.
Before you begin
- Your file: have a CSV, XLSX, GeoJSON, KML, zipped shapefile or zipped MapInfo TAB file ready, up to 50 MB. You can upload points, lines or polygons:
- Points, such as sites or branches, need latitude and longitude columns or an address for each row.
- Lines and polygons, such as pipelines or service areas, come from a spatial file – GeoJSON, KML, shapefile or MapInfo TAB – with the geometry already drawn.
- Personal information: you must not upload personal information, such as individuals' names, home addresses or phone numbers. Site, asset and branch names are fine.
Note: anyone in your organisation can upload data, and every layer is visible to everyone in your organisation. Your data is hosted in Australia. Placemaker keeps the locations and fields it reads from your file, not the file itself.
Steps
- Open Your data: in the toolbar on the left of the map, select the Your data icon (the cylinder, below Base maps).
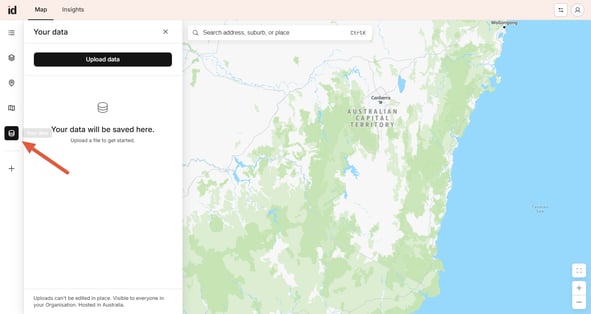
- Start the upload: select the black Upload data button at the top of the panel.
- Choose your file: drag your file into the box, or select browse and pick it from your computer.
- Check what Placemaker found: the Check step tells you how many locations it found – for example '50 coordinate pairs detected' or '43 addresses detected'. The columns used for location are marked LOCATION, and the first rows of your file are shown underneath. If this looks right, select Continue.

- Fix any addresses that didn't match (address files only): Placemaker looks up each address and lists those it couldn't place with confidence.
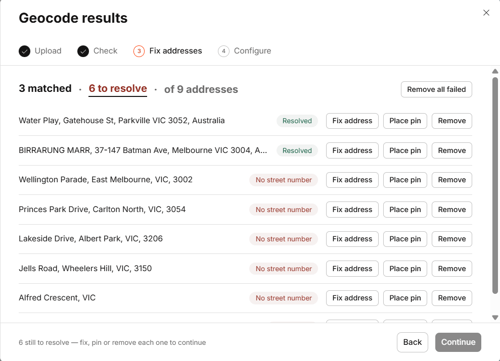
For each one select either:- Fix address to correct it and then Re-geocode,
- Place pin to drop the location on a map yourself, or select
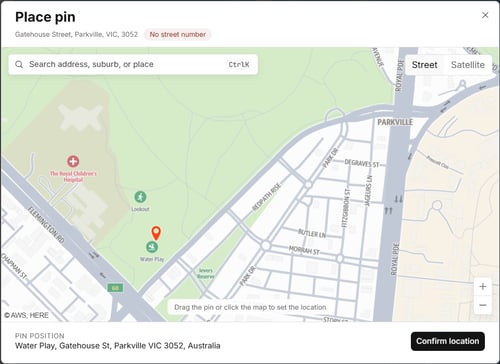
- Select Remove to leave it out. Remove all failed to drop every unmatched address at once. When you're happy with the list, select Continue.
- Set up your layer: name the layer and choose the field it's labelled by. Choose which fields show when someone clicks a location, then choose a colour – Single colour, or By category to colour locations by a field in your file. The map preview and the pop-up preview update as you go. Select Continue to save the layer.

What to expect
Your upload appears at the top of the History list in the Your data panel, with its name, the number of points or polygons, the date and who uploaded it. It's also listed in the Locations panel with a 'Your data' tag. Tick it there to show it on the map, then click any location to see the fields you chose.
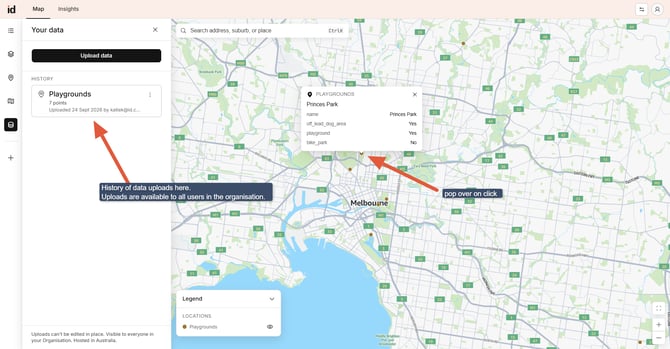
You can change the name, label, pop-up fields and colour later.
You can't edit the data itself – to change it, delete the layer and upload the corrected file.
Troubleshooting
- Placemaker says 'File is empty' but your file has data: check your spreadsheet starts with its column headers in the first row. A title or note above the headers stops Placemaker reading the rows. Delete the extra rows, save and upload again.
- Many addresses need fixing: check each address has a street, suburb, state and postcode, and that the postcode matches the suburb. See My file won't upload to Placemaker.
Related articles: